


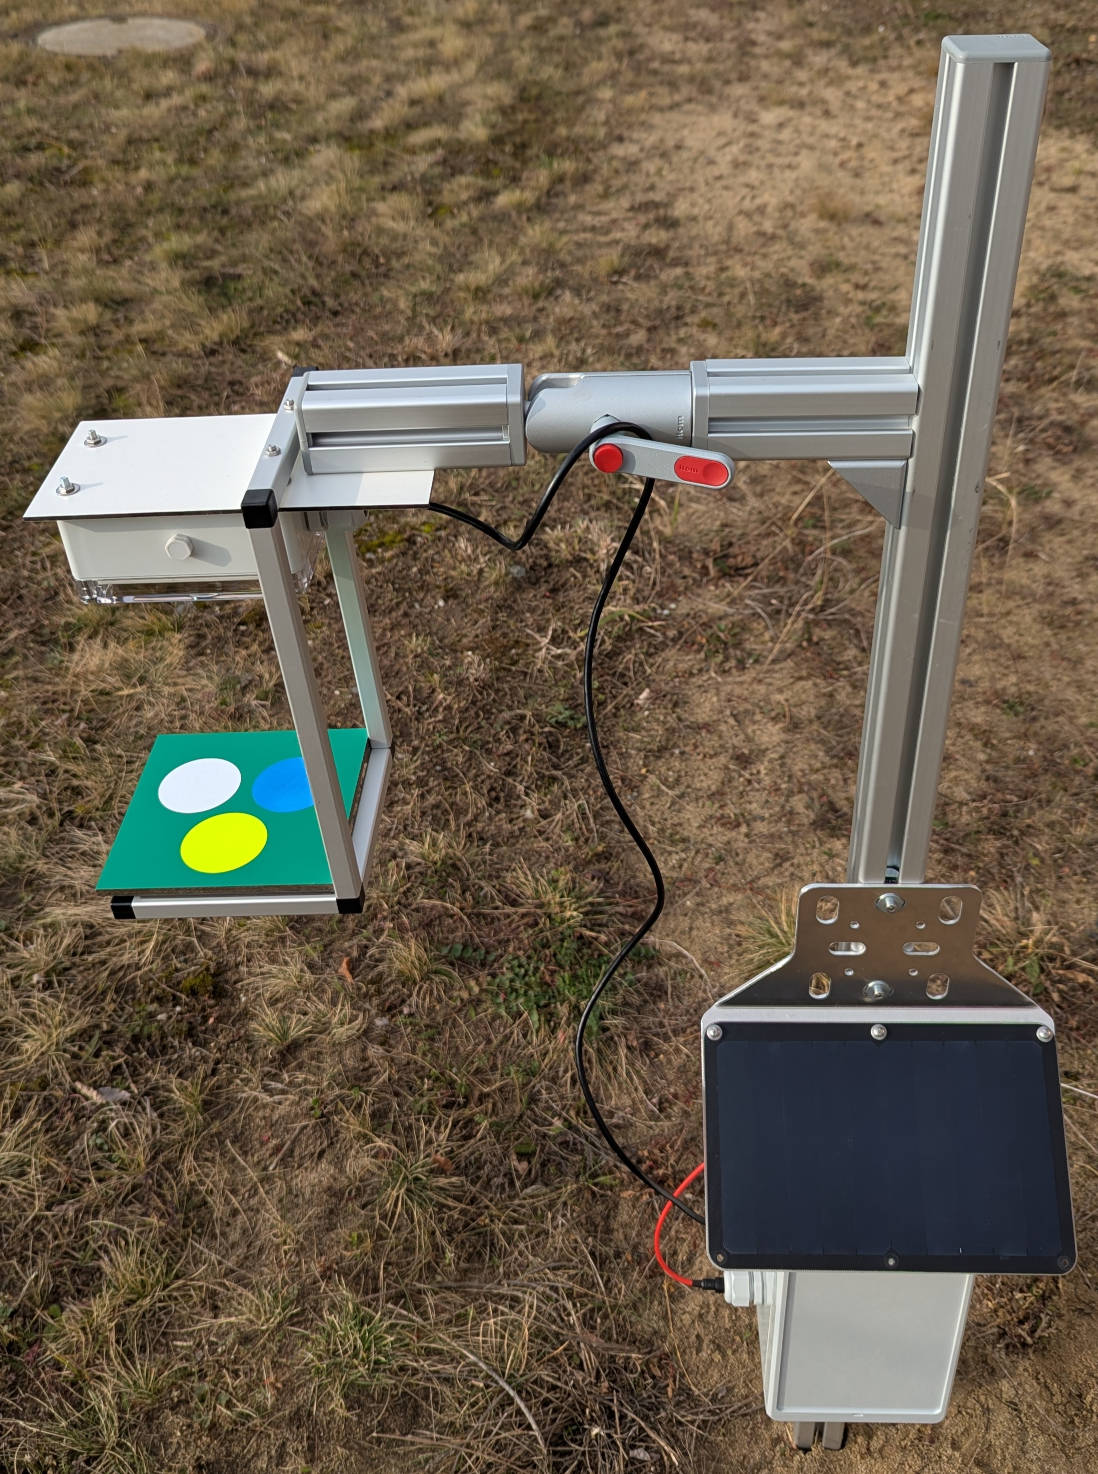
The Insect Detect camera trap automatically detects and tracks insects in the field and captures high-resolution images of each individual - running a custom detection model in real time on the camera itself, with no internet connection required.
The system is built from low-cost off-the-shelf hardware components (Raspberry Pi Zero 2 W, Luxonis OAK-1, Witty Pi 4 L3V7) combined with the open source software in this repository. Fully solar-powered and equipped with intelligent power management, it can operate autonomously at remote locations. Assembly and setup are covered in the provided instructions.
During a recording session, the camera trap saves the captured images and the
corresponding metadata to its microSD card. Use the
insect-detect-post software to turn
this raw output into classified and filtered results, ready for analysis.
- Features
- Installation
- Usage
- Settings
- Detection models
- Processing pipeline
- Post-processing
- License
- Citation
- On-device detection + tracking - a custom insect detection model and an object tracker run in real time on the OAK camera.
- High-resolution capture - tracker/model output from inference on downscaled frames is synchronized on device with MJPEG-encoded high-resolution frames (default: 3840x2160 px) that are saved to the microSD card.
- Triggered + timelapse capture - frames are captured at configurable intervals while an insect is detected, and optionally as timelapse images.
- Metadata logging - timestamp, label, confidence score, tracking ID, tracking status, bounding box coordinates and camera settings (lens position, ISO, exposure time) are saved to a metadata .csv file for each detected and tracked insect.
- Real-time image processing - detections can optionally be cropped from the full frames and/or drawn as bounding box + metadata overlays while the recording session is running. Original frames can be deleted afterwards to save storage space.
- Web app - browser-based interface with live MJPEG stream and bounding box overlay, interactive zoom/focus controls, all configuration settings, deployment metadata input (incl. GPS coordinates via the browser Geolocation API), log file viewer, system info panel and an integrated terminal with full shell access to the Raspberry Pi.
- Data download - captured images and metadata can be downloaded from the web app as a zip archive, without removing the microSD card or interrupting the deployment.
- Config profiles - save, switch between and reuse multiple named configuration
files (
.yaml) for different deployment setups. - Intelligent power management - battery charge level monitoring with conditional recording durations and skipping of recording sessions on low charge.
- Automatic startup - a systemd service can launch the web app or a recording session on boot, with an optional fallback to the other application after a configurable delay.
- Network management - Raspberry Pi Wi-Fi hotspot for direct connection in the field, or automatic connection to configured Wi-Fi networks, both set up on startup.
- Archiving + upload - after each recording session, the captured data can be copied to a separate archive directory as uncompressed zip files and uploaded to a remote server or cloud storage via Rclone, including automatic deletion of the oldest original data when free disk space runs low.
- Safety stop conditions - recording sessions are stopped early if free disk space, battery charge or OAK chip temperature reach their configured limits.
- System metrics logging - optional periodic logging of CPU/RAM usage, Raspberry Pi and OAK chip temperature, and power management info.
- Low power consumption - running a recording session with default configuration settings consumes around 4.2 W of power.
Important
Please make sure that you followed all steps to set up your Raspberry Pi.
Install the insect-detect software including all required packages, and run all setup steps:
wget -qO- https://raw.githubusercontent.com/maxsitt/insect-detect/main/install.sh | bashThe installer sets up udev rules for OAK camera access, installs
git and uv, clones this repository
to ~/insect-detect, creates a virtual environment with access to system site packages
(required for GPIO access), installs all Python packages, downloads the detection
models, generates self-signed SSL certificates for the web app and installs + enables
the insect-detect-startup.service systemd service.
Optional: Install and configure Rclone if you want to use the upload feature:
wget -qO- https://rclone.org/install.sh | sudo bashUpdate an existing installation to the latest version:
cd insect-detect
bash update.sh
All config files are backed up to configs_backup/<timestamp>/ before updating.
Local changes are stashed and restored after the update, Python packages are
re-synced if the dependencies changed, and new or missing detection models are
downloaded automatically.
All commands are run from the insect-detect directory:
cd insect-detectStart the web app to check the live stream, adjust the camera settings and configure the recording settings:
uv run webappConnect to the Raspberry Pi Wi-Fi hotspot or to the same network as the Raspberry Pi and open the web app in your browser:
- HTTP:
http://<hostname>:5000 - HTTPS:
https://<hostname>:8443(needs to be enabled in config)
You can also use the IP address instead of the hostname - both are printed to the
console and to logs/webapp.log on startup.
HTTPS is required for the browser Geolocation API that can be used to fill in the GPS coordinates of the deployment site. When connecting via HTTPS for the first time, you will have to accept the self-signed SSL certificate in your browser.
Use Stop App to shut down the web app (optionally saving the config beforehand) and Start Rec to shut down the web app and start a recording session as a new process.
Start a recording session:
uv run captureImportant
With the default configuration (recording.shutdown.enabled: true), the Raspberry Pi
is shut down after each recording session. Set it to false for testing.
Each recording session:
- Initializes the power manager and checks free disk space + battery charge level (shuts down without recording if either is too low).
- Determines the session duration based on the current battery charge level.
- Creates a timestamped session directory and saves a snapshot of the active config and the OAK pipeline schema.
- Captures detection-triggered and timelapse frames + metadata until a stop condition is reached (configured duration exceeded, external shutdown trigger, low disk space, high OAK chip temperature, low battery charge, or lost OAK connection).
- Crops detections and/or draws overlays in real time, if enabled.
- Archives and optionally uploads the captured data, if enabled.
~/insect-detect/
├── configs/                                       # config files (active file set in config_selector.yaml)
├── models/                                        # detection model archives + models.json registry
├── logs/                                          # capture.log, webapp.log, startup.log, subprocess.log, rclone.log
├── data/
│   ├── session_info.csv                           # one row per recording session
│   ├── last_session_id.txt
│   └── 2026-08-07/                                # date directory
│       └── 2026-08-07_10-15-30/                   # recording session directory
│           ├── <device_id>_<timestamp>.jpg        # detection-triggered full frames
│           ├── 2026-08-07_10-15-30_metadata.csv   # metadata for each detected and tracked insect
│           ├── 2026-08-07_10-15-30_config.json    # config snapshot for this session (passwords masked)
│           ├── 2026-08-07_10-15-30_pipeline_schema.json  # OAK pipeline schema snapshot for this session
│           ├── 2026-08-07_10-15-30_system_log.csv # system metrics logs (if metrics.enabled)
│           ├── timelapse/                         # timelapse frames
│           ├── crops/<label>/                     # cropped detections, if processing.crop.enabled
│           └── overlays/                          # frames with overlays, if processing.overlay.enabled
└── data_archived/<device_id>/                     # zipped archive copies, if storage.archive.enabled
The metadata .csv file contains one row per detected and tracked insect per captured
frame, with the columns device_id, session_id, timestamp, label, confidence,
track_id, track_status, x_min, y_min, x_max, y_max, lens_position,
iso_sensitivity, exposure_time and filename. Bounding box coordinates are
normalized to the full frame (0-1).
See Post-processing for turning this output into classified and filtered results ready for analysis.
Transferring the captured data by removing the microSD card is significantly faster, but requires interrupting the deployment and opening the enclosure. For a quick check of the data in the field, use the Download Data section of the web app.
Select one or more recording sessions and the content that you want to download:
| Content | Included data |
|---|---|
all |
everything except overlay frames (default) |
full |
detection-triggered full frames |
crops |
cropped detections |
overlays |
full frames with bounding box overlays |
timelapse |
timelapse frames |
metadata |
metadata .csv and config .json files, no images |
Every content option also includes the metadata .csv and config .json files of the selected sessions.
The live stream and OAK camera are stopped while images are downloaded. After the download is finished, both can be restarted with the Resume Stream button in the video container.
Log files can be downloaded from the Advanced > View Logs section, either individually or all at once as a zip archive. Downloading the log file will always provide the complete file, while the viewer only shows the last 1000 lines.
The insect-detect-startup.service systemd service is installed and enabled by
install.sh and runs the startup sequence after each boot: creating the Wi-Fi hotspot,
setting up all configured Wi-Fi networks in NetworkManager and - if
startup.auto_run.enabled is true - launching the configured primary application
(capture or webapp). If a fallback application is configured, it is started after
startup.auto_run.delay seconds. When primary is webapp, the fallback is cancelled
if you connect to the live stream at any point during the delay window.
All configuration parameters can be customized in the web app or by directly modifying the
config.yaml
file. You can generate multiple custom configuration files and select the active config either in
the web app or by modifying the
config_selector.yaml.
All settings are validated with Pydantic. Missing keys are filled with their default values, unknown keys are ignored and out-of-range numeric values are automatically clamped to their allowed bounds (with a warning logged and the corrected value written back to the config file). Additional constraints:
processing.deleterequiresprocessing.croporprocessing.overlayto be enabled.camera.focus.rangemin values must be less than the corresponding max values.startup.auto_run.fallbackmust differ fromstartup.auto_run.primary.- Wi-Fi and hotspot passwords must be at least 8 characters long (WPA2).
led.gpio_pinmust be one of the allowed BCM pins (see System).
Optional metadata describing the current field deployment. Saved to the config snapshot
of each recording session. setting is written to the metadata during post-processing
with insect-detect-post.
| Setting | Type / Options | Default | Description |
|---|---|---|---|
deployment.start |
string | null |
null |
Start time of the camera deployment (ISO 8601 format), can be filled with the current RPi time in the web app. |
deployment.location.latitude |
float | null |
null |
Latitude of the deployment site (decimal degrees). |
deployment.location.longitude |
float | null |
null |
Longitude of the deployment site (decimal degrees). |
deployment.location.accuracy |
float | null |
null |
Accuracy of the GPS coordinates (meters), set by the browser Geolocation API. |
deployment.setting |
string | null |
null |
Background setting of the camera deployment (e.g. platform type/flower species). |
deployment.distance |
int | null |
null |
Distance (cm) from the camera to the background (e.g. platform/flower). |
deployment.notes |
string | null |
null |
Additional fieldnotes about the deployment. |
OAK camera settings for frame rate, image quality, zoom, focus and ISP.
| Setting | Type / Options | Default | Description |
|---|---|---|---|
camera.fps |
int (1-20) |
15 |
Frame rate of the camera output used for detection model inference and object tracking. |
camera.image.resolution |
4k, 4k-square, 1080p, 1080p-square |
4k |
Resolution preset for captured full images: 4k (3840x2160), 4k-square (2176x2160), 1080p (1920x1080), 1080p-square (1088x1080). |
camera.image.quality |
int (10-100) |
80 |
JPEG quality of the captured full images. |
camera.zoom.enabled |
bool |
false |
Crop to zoom factor to restrict the camera field of view. |
camera.zoom.factor |
float (1.0-3.0, steps of 0.1) |
1.0 |
Zoom factor. Values > 1.0 crop symmetrically around the center, keeping the original aspect ratio. Applied to both the full frame output and the detection model input. |
camera.focus.mode |
continuous, manual, range |
continuous |
Focus mode: continuous auto focus, fixed position (focus.manual) or auto focus restricted to a range (focus.range). |
camera.focus.type |
lens_pos, distance |
lens_pos |
Whether focus positions are specified as OAK lens position values or as subject distance in cm. |
camera.focus.manual.lens_pos |
int (120-255) |
156 |
Fixed lens position for manual focus mode (120 = infinity, 255 = closest focus distance). |
camera.focus.manual.distance |
int (8-80) |
19 |
Fixed subject distance (cm) for manual focus mode, converted to a lens position. |
camera.focus.range.lens_pos.min |
int (120-210) |
154 |
Minimum lens position for range focus mode (must be less than max). |
camera.focus.range.lens_pos.max |
int (122-255) |
165 |
Maximum lens position for range focus mode. |
camera.focus.range.distance.min |
int (8-75) |
15 |
Minimum subject distance (cm) for range focus mode (must be less than max). |
camera.focus.range.distance.max |
int (9-80) |
20 |
Maximum subject distance (cm) for range focus mode. |
camera.isp.sharpness |
int (0-4) |
1 |
ISP sharpness level. |
camera.isp.luma_denoise |
int (0-4) |
1 |
ISP luma noise reduction level. |
camera.isp.chroma_denoise |
int (0-4) |
1 |
ISP chroma noise reduction level. |
Object detection model and inference settings.
| Setting | Type / Options | Default | Description |
|---|---|---|---|
detection.model |
string |
platform_insect-detect-tiled_v2-0-0.tar.xz |
Filename of the detection model archive in models/, downloaded from the model registry during install. |
detection.num_shaves |
int (1-10) |
4 |
Number of SHAVE cores on the OAK chip that the detection model can use for inference. |
detection.conf_threshold |
float (0-1) |
0.5 |
Minimum confidence score required for a detection to be processed. |
detection.ae_region.enabled |
bool |
false |
Meter the auto exposure from the bounding box of the most recent active tracking ID instead of from the full frame. |
Object tracker settings for the depthai ObjectTracker node.
| Setting | Type / Options | Default | Description |
|---|---|---|---|
tracking.type |
SHORT_TERM_IMAGELESS, ZERO_TERM_IMAGELESS |
SHORT_TERM_IMAGELESS |
Tracker algorithm: SHORT_TERM_IMAGELESS extrapolates the trajectory from recent frames, ZERO_TERM_IMAGELESS only associates new detections to existing tracks. |
tracking.occlusion_ratio_threshold |
float (0-1) |
0.5 |
IoU threshold above which overlapping tracklets are filtered out. |
tracking.tracklet_birth_threshold |
int (1-100) |
15 |
Number of frames after which a NEW tracklet is marked as TRACKED. |
tracking.tracklet_max_lifespan |
int (1-500) |
60 |
Number of frames after which a LOST tracklet is REMOVED. |
tracking.filter_stale_tracklets |
bool |
true |
Skip stale tracklets whose source detection was not updated by the detection model. |
Recording session duration, capture intervals and shutdown behavior.
| Setting | Type / Options | Default | Description |
|---|---|---|---|
recording.duration.default |
int (1-180) |
40 |
Maximum recording duration (minutes) per session if power management is disabled or the battery level cannot be read. |
recording.duration.battery.high |
int (1-180) |
40 |
Maximum recording duration (minutes) at a high charge level (>= 70% or USB power connected). |
recording.duration.battery.medium |
int (1-120) |
20 |
Maximum recording duration (minutes) at a medium charge level (50-69%). |
recording.duration.battery.low |
int (1-60) |
10 |
Maximum recording duration (minutes) at a low charge level (30-49%). |
recording.interval.detection |
float (0-600) |
1.0 |
Capture interval (seconds) while an insect is detected. Set to 0 to capture images as fast as possible. |
recording.interval.timelapse |
float (0-3600) |
600.0 |
Capture interval (seconds) independent of detections. Set to 0 to capture images as fast as possible. |
recording.shutdown.enabled |
bool |
true |
Shut down the Raspberry Pi after each recording session. |
Image processing settings applied to captured full images while the recording session is running.
| Setting | Type / Options | Default | Description |
|---|---|---|---|
processing.crop.enabled |
bool |
false |
Crop individual detections from the full images and save them as separate files in crops/<label>/. |
processing.crop.method |
square, original |
square |
Crop method: square crops to a square bounding box, which can improve subsequent classification; original keeps the original bounding box aspect ratio. |
processing.overlay.enabled |
bool |
false |
Draw bounding boxes and metadata overlays on the full images and save them as copies in overlays/. |
processing.delete.enabled |
bool |
false |
Delete the original full images after image processing is complete. Requires crop or overlay to be enabled. |
| Setting | Type / Options | Default | Description |
|---|---|---|---|
webapp.stream.quality |
int (10-100) |
70 |
JPEG quality of the streamed frames. Frame rate and resolution of the stream are derived from the camera config. |
webapp.https.enabled |
bool |
false |
Serve the web app over HTTPS on port 8443 instead of HTTP on port 5000. Requires SSL certificates in ~/insect-detect/ssl/ and is needed for the browser Geolocation API. |
| Setting | Type / Options | Default | Description |
|---|---|---|---|
network.mode |
wifi, hotspot |
wifi |
Connect to one of the configured Wi-Fi networks if available (wifi), or start the Raspberry Pi Wi-Fi hotspot (hotspot). |
network.hotspot.ssid |
string | null |
null |
SSID of the Raspberry Pi Wi-Fi hotspot. If not set, the hostname is used and written to the config file on startup. |
network.hotspot.password |
string | null |
null |
Password of the hotspot (at least 8 characters). If not set, the hostname is used (padded with hyphens if too short). |
network.wifi |
list of ssid + password |
one empty entry | Wi-Fi networks to connect to, tried in the listed order. Passwords must be at least 8 characters long. |
Power management, OAK monitoring, LED and system metrics settings.
| Setting | Type / Options | Default | Description |
|---|---|---|---|
powermanager.enabled |
bool |
true |
Enable battery charge level monitoring via a connected power management board. |
powermanager.model |
wittypi, pijuice |
wittypi |
Power management board model (Witty Pi 4 L3V7 or PiJuice Zero). |
powermanager.charge_min |
int (10-95) |
30 |
Minimum battery charge (%) required to start and continue a recording session. |
powermanager.charge_check |
int (1-600) |
30 |
Interval (seconds) to check the battery charge level during recording. |
oak.temp_max |
int (70-105) |
100 |
Maximum allowed OAK chip temperature (°C) before a recording session is stopped. |
oak.temp_check |
int (1-600) |
30 |
Interval (seconds) to check the OAK chip temperature during recording. |
led.enabled |
bool |
false |
Enable LED status indication via Raspberry Pi GPIO (fast blinking during startup, slow blinking while the web app is running, constantly on during recording). |
led.gpio_pin |
int (allowed pins) |
18 |
GPIO pin (BCM numbering) the LED is connected to. Allowed: 7, 8, 9, 10, 11, 12, 13, 16, 18, 19, 20, 21, 22, 23, 24, 25, 26, 27 (pins used by the Witty Pi 4 L3V7 are excluded). |
metrics.enabled |
bool |
false |
Enable periodic system metrics logging (CPU, RAM, temperature, power info) to <session>_system_log.csv. |
metrics.interval |
int (1-600) |
30 |
Interval (seconds) to log system metrics during recording. |
Local storage monitoring, archiving and upload settings.
| Setting | Type / Options | Default | Description |
|---|---|---|---|
storage.disk_min |
int (100-10000) |
1000 |
Minimum required free disk space (MB) to start and continue a recording session. |
storage.disk_check |
int (1-600) |
60 |
Interval (seconds) to check the available disk space during recording. |
storage.archive.enabled |
bool |
false |
Copy captured data to a separate archive directory after the recording session. Only the session that just ended is archived. Images are stored as uncompressed zip files, metadata/log/config files are copied directly. Sessions that were stopped early by an external trigger, low disk space or low battery charge are skipped and not archived later. |
storage.archive.disk_low |
int (500-50000) |
5000 |
Free disk space threshold (MB) below which the oldest original date directories are deleted after archiving. Directories containing a session that was not archived are never deleted, so recording stops at storage.disk_min instead. |
storage.upload.enabled |
bool |
false |
Upload archived data to a remote server or cloud storage via Rclone. Archiving is always run before uploading. Only the session that just ended is uploaded, together with the log and metadata files. |
storage.upload.content |
all, full, crops, overlays, timelapse, metadata |
crops |
Which archived files to upload (all options include metadata, log and config files): all uploads everything except overlay frames, full/crops/overlays/timelapse upload only the respective zip files, metadata uploads no images. Images are uploaded as one zip file per category, metadata/log/config files are copied directly. |
Automatic network setup and application launch on startup (requires the enabled
insect-detect-startup.service systemd service).
| Setting | Type / Options | Default | Description |
|---|---|---|---|
startup.hotspot_setup.enabled |
bool |
true |
Automatically create the Raspberry Pi Wi-Fi hotspot on startup if it does not already exist in NetworkManager. |
startup.network_setup.enabled |
bool |
true |
Automatically create/update all Wi-Fi networks from the config in NetworkManager on startup. |
startup.auto_run.enabled |
bool |
false |
Automatically launch capture or webapp on startup. |
startup.auto_run.primary |
capture, webapp |
capture |
Application launched immediately on startup. |
startup.auto_run.fallback |
capture, webapp, null |
null |
Application launched after delay seconds if primary has not been interrupted by user interaction. Must differ from primary, null disables it. |
startup.auto_run.delay |
int (10-3600) |
180 |
Time (seconds) before primary is terminated and fallback is started. If primary is webapp, connecting to the live stream within this window cancels the fallback launch. |
Important
New detection models are trained with luxonis-train
based on an updated training dataset version.
The new training dataset and model training approach will be published soon, together with more details about the detection model.
Warning
Detection model training is currently being refactored and will be updated soon. YOLO detection models trained with the previous approach are not supported anymore after insect-detect v2.0.0.
All available models are defined in the
models/models.json
registry with their download URL and SHA-256 checksum. They are downloaded and verified
by models/download_models.py, which is run automatically during installation and
update. Models that are already present are skipped, so the script can be re-run at
any time to fetch missing models:
cd insect-detect
uv run python models/download_models.py
Select the model that is used for inference with the detection.model setting
(filename of the model archive in models/).
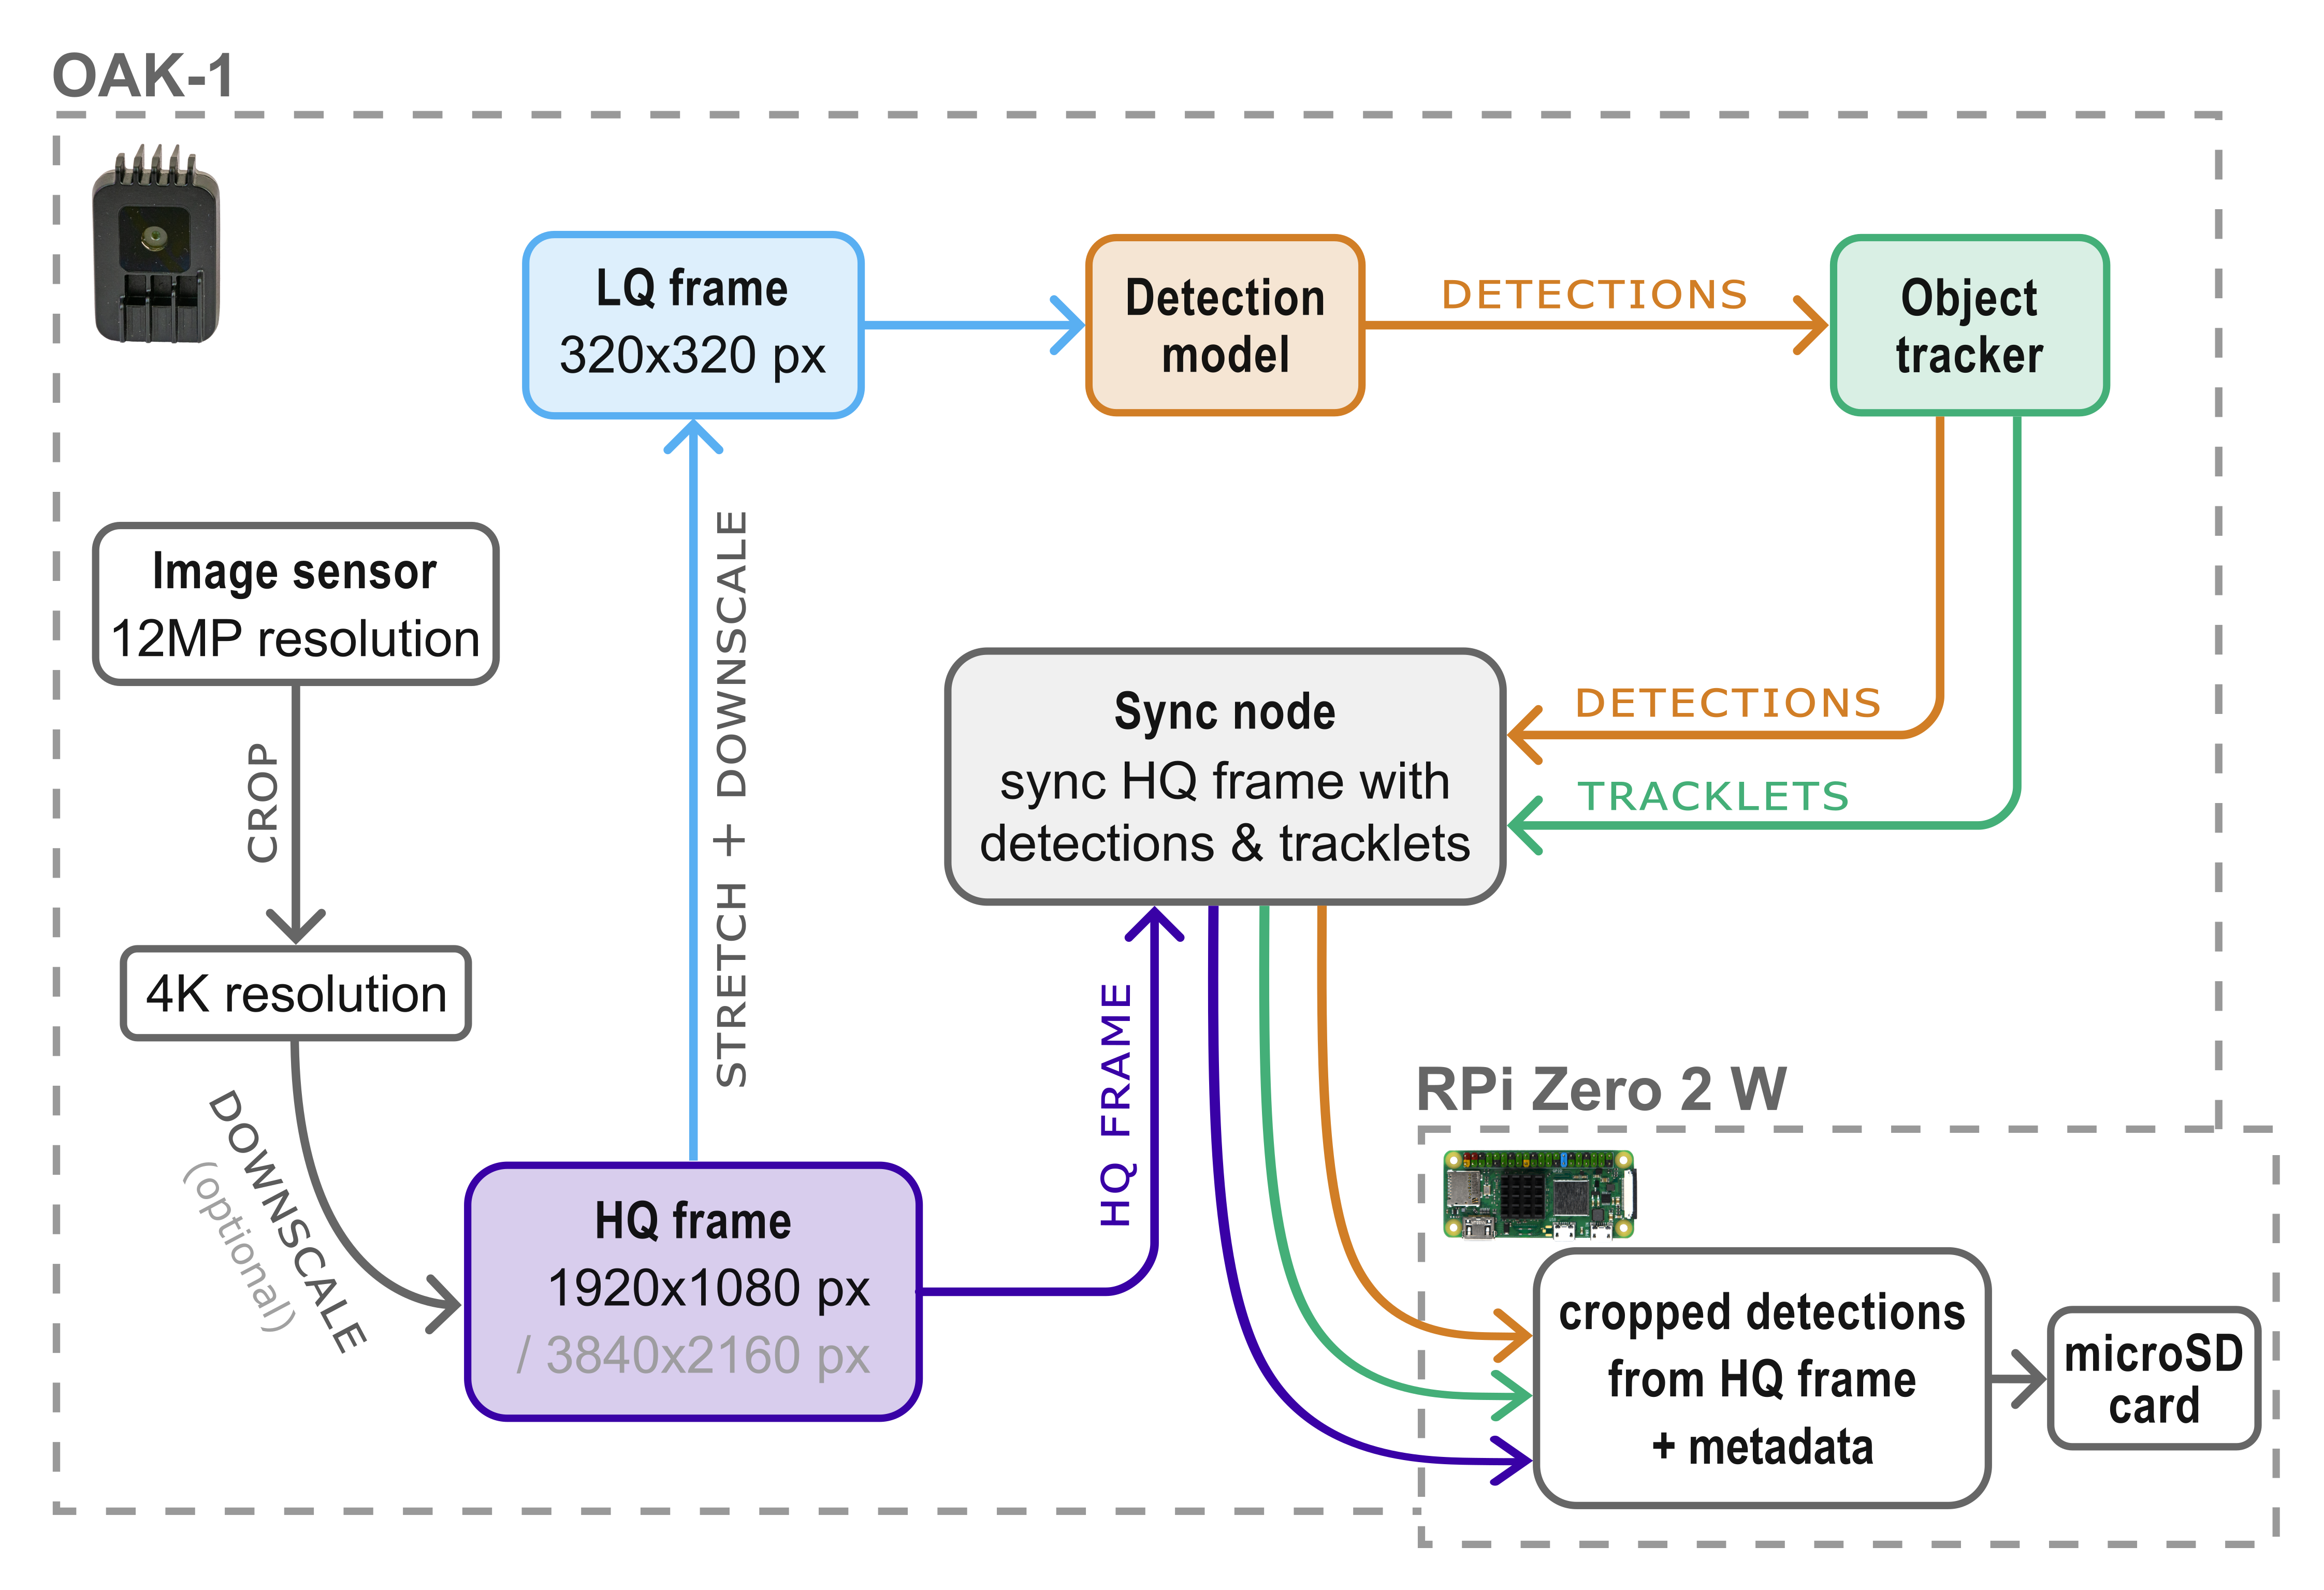
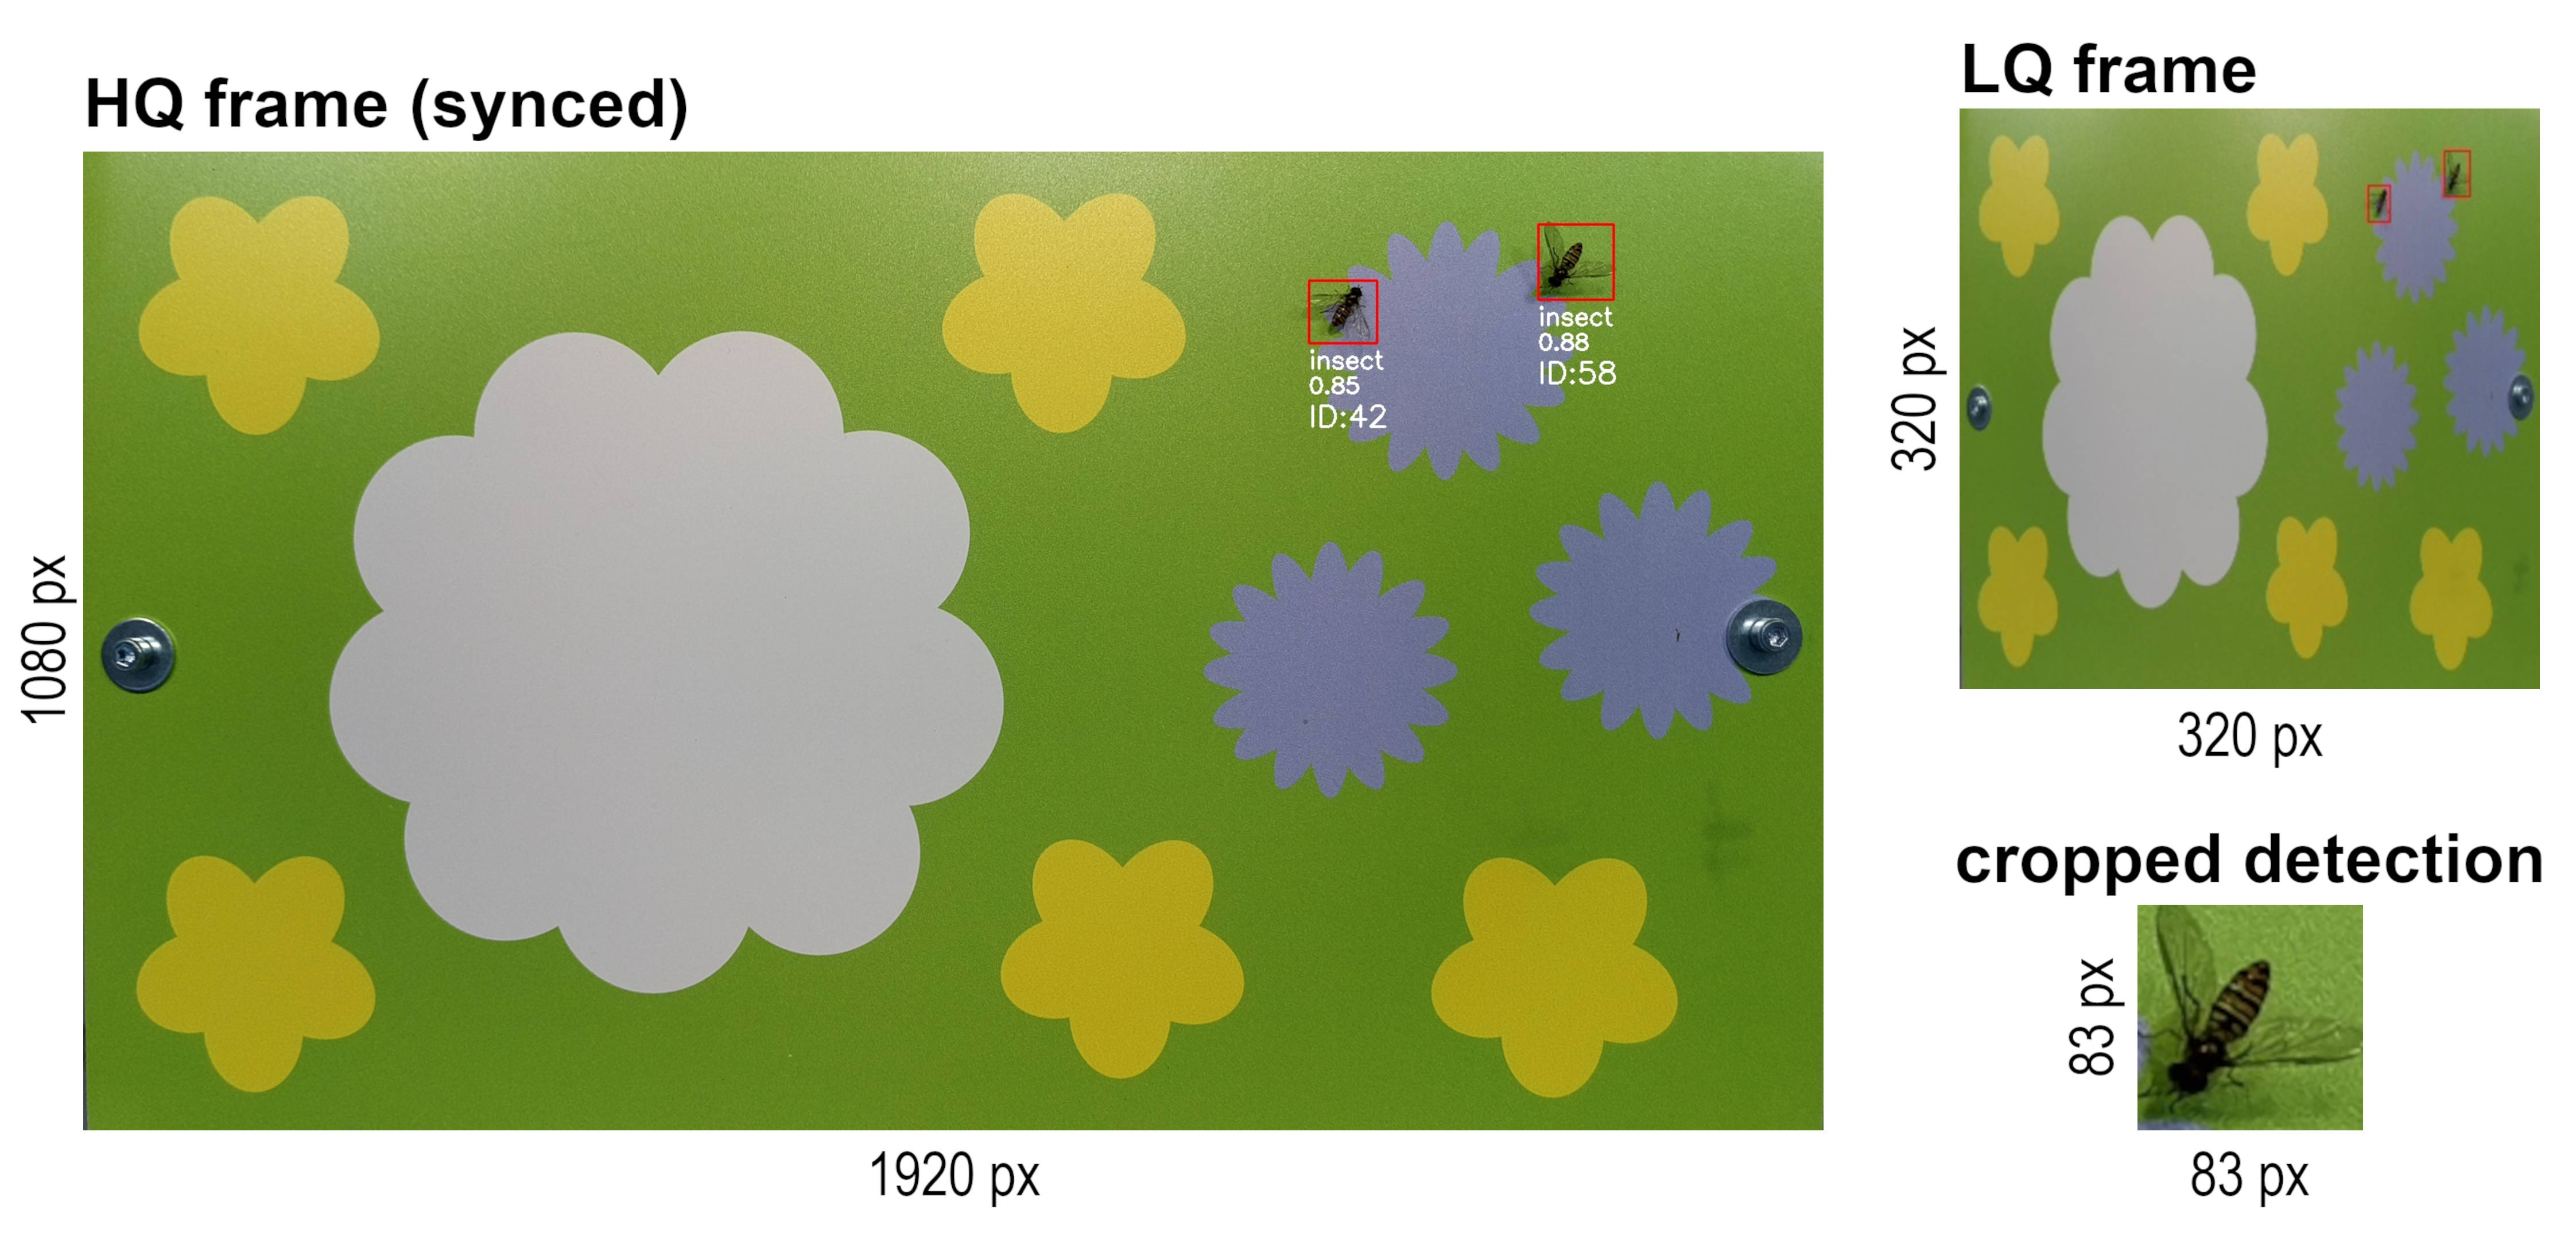
- A custom insect detection model is run in real time on device (OAK) and uses a continuous stream of downscaled frames as input.
- An object tracker uses the bounding box coordinates of detected insects to assign a unique tracking ID to each individual present in the frame and track its movement through time.
- The tracker + model output from inference on downscaled frames is synchronized with MJPEG-encoded high-resolution frames (default: 3840x2160 px) on device (OAK), which are saved to the microSD card together with the corresponding metadata.
Install and use the insect-detect-post
software for post-processing of data captured with the Insect Detect camera trap.
It turns the images and metadata captured by the camera trap into cropped,
classified and filtered results ready for analysis, by combining image processing,
AI-based classification and metadata aggregation into a single configurable pipeline.
This repository is licensed under the terms of the GNU General Public License v3.0 (GNU GPLv3).
If you use resources from this repository, please cite our paper:
Sittinger M, Uhler J, Pink M, Herz A (2024) Insect detect: An open-source DIY camera trap for automated insect monitoring. PLOS ONE 19(4): e0295474. https://doi.org/10.1371/journal.pone.0295474