
Allows the Nintendo Switch Pro Controller, Joycons, and Switch SNES controller to be used with Cemu using Cemuhook, Citra, Dolphin, Yuzu, and system-wide with generic XInput support.
It also allows using the gyro to control your mouse and remap the special buttons (SL, SR, Capture) to key bindings of your choice.
If anyone would like to donate (for whatever reason), you can do so here.
Thank you for using my software and all the constructive feedback I've been getting about it. I started writing this project a while back and have since then learnt a lot more about programming and software development in general. I don't have too much time to work on this project, but I will try to fix bugs when and if they arise. Thank you for your patience in that regard too!
It's been quite a wild ride, with nearly 590k (!!) official download on GitHub and probably many more through the nightlies. I think this project was responsible for both software jobs I landed so far, so I am quite proud of it.
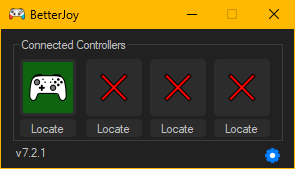
Go to the Releases tab!
- Install drivers
- Read the READMEs (they're there for a reason!)
- Run Drivers/ViGEmBus_1.22.0_x64_x86_arm64.exe
- Restart your computer
- Optional: if other programs (e.g. Steam) fight BetterJoy2 over your controller, run Drivers/HidHide_1.5.230_x64.exe and enable "UseHidHide" in the settings panel, this hides the controller from every other program entirely.
- Run BetterJoyForCemu.exe
- Run as Administrator if your keyboard/mouse button mappings don't work
- Connect your controllers.
- Start Cemu and ensure CemuHook has the controller selected.
- If using Joycons, CemuHook will detect two controllers - each will give all buttons, but choosing one over the other just chooses preference for which hand to use for gyro controls.
- Go into Input Settings, choose XInput as a source and assign buttons normally.
- If you don't want to do this for some reason, just have one input profile set up with Wii U Gamepad as the controller and enable "Also use for buttons/axes" under GamePad motion source. This is no longer required as of version 3
- Turn rumble up to 70-80% if you want rumble.
- As of version 3, you can use the pro controller and Joycons as normal xbox controllers on your PC - try it with Steam!
Check out the wiki! There, you'll find all sorts of goodness such as the changelog, description of app settings, and the FAQ and Problems page. If Steam (or another program) fights BetterJoy over your controller, see the optional HidHide driver mentioned above - it hides the controller from everything except BetterJoy.
- Hold down the small button (sync) on the top of the controller for 5 seconds - this puts the controller into broadcasting mode.
- Search for it in your bluetooth settings and pair normally.
- To disconnect the controller - hold the home button (or capture button) down for 2 seconds (or press the sync button). To reconnect - press any button on your controller.
- Plug the controller into your computer.
- Go into "Bluetooth and other devices settings"
- Under the first category "Mouse, keyboard, & pen", there should be the pro controller.
- Click on it and a "Remove" button will be revealed.
- Press the "Remove" button
- Install Visual Studio (Community edition is fine) with the .NET desktop development workload - official guide.
- Get the code via Git or the Download ZIP button.
- Run
build.batin the repo root. It locates MSBuild, restores NuGet packages, and builds Release|x64. - If Inno Setup is also installed, it additionally packages the build into an installer at Installer\Output\BetterJoy-Setup-vVERSION.exe. If not, this step is skipped and you still get a working build.
- If you didn't already, install Visual Studio Community via the official guide. When asked about the workloads, select .NET Desktop Development.
- Get the code project via Git or by using the Download ZIP button.
- Open Visual Studio Community and open the solution file (BetterJoy.sln).
- Open the NuGet manager via Tools > NuGet Package Manager > Package Manager Settings.
- You should have a warning mentioning restoring your packages. Click on the Restore button.
- You can now run and build BetterJoy.
- Download Visual Studio Build Tools via the official link.
- Install NuGet by following
the official guide.
You should follow the section for nuget.exe.
Verify that you can run
nugetfrom your favourite terminal. - Get the code project via Git or by using the Download ZIP button.
- Open a terminal (cmd, PowerShell, ...) and enter the folder with the source code.
- Restore the NuGet dependencies by running:
nuget restore - Now build the app with MSBuild:
The available values for CONFIGURATION are Release and Debug. The available values for PLATFORM are x86 and x64 (you want the latter 99.99% of the time).
msbuild .\BetterJoy.sln -p:Configuration=CONFIGURATION -p:Platform=PLATFORM -t:Rebuild - You have now built the app. See the next section for locating the binaries.
The built binaries are located under
BetterJoyForCemu\bin\PLATFORM\CONFIGURATION
where PLATFORM and CONFIGURATION are the one provided at build time.
There is A LOT of love and hate around AI right now, with legitimate concerns about code quality, livelihoods, authorship, identity, and what any of this means for skilled work. Until recently, I was reluctant to use AI for even mundane tasks, let alone something this complex. I also deal with plenty of imposter syndrome, or maybe just an uncomfortable awareness of exactly where my own knowledge ends.
I'm not going to pretend that AI helping me write code suddenly makes me a computer scientist or gives me decades of low-level Windows input experience. It doesn't. There are developers who understand and can write this code at a level I cannot, and I respect the hell out of that. What AI has done is remove a massive implementation barrier between understanding a problem, having a vision for how it should behave, and being able to test that vision in working software.
My role in this project is closer to a technical director than a traditional programmer. I define how the system should behave, identify the problems and edge cases that matter, direct the implementation, test it against real hardware, analyze failures, and decide whether the result is actually good enough to ship. I may not understand every subsystem from first principles, but I have a very specific vision for the system's surface behavior. That is not superficial. It is the reason the underlying engineering exists.
A technically sophisticated implementation is still wrong if a controller reconnects under the wrong player number, a Joy-Con cannot transition cleanly between solo and paired operation, the GUI fights with an already-running service, or the gyro mathematically works but feels like shit in your hands. The implementation has to serve the behavior.
AI has dramatically expanded what I can build, but it has not eliminated the need for expertise or judgment. If anything, faster implementation makes judgment more important: bad ideas can become working code just as quickly as good ones. Code can compile, look convincing, and survive a quick test while still being fundamentally wrong once it meets real hardware and real-world edge cases. I still have to know what to ask for, what to test, which assumptions to challenge, what to throw away, and when something that looks correct in the source clearly is not.
So yeah, call it AI-assisted, vibe coded, AI-written, or whatever you want. I'm not going to hide the toolchain or claim expertise I do not have. AI helps produce and analyze implementations at a speed I could never achieve manually. The vision, requirements, hardware validation, interpretation, judgment, and decision to ship remain mine.
Judge the project by what it actually does, how reliably it does it, whether the work of others is properly credited, whether its problems are documented honestly, and whether the software keeps getting better.
BetterJoy2 is built on a long chain of open-source controller work. The following projects contributed code, algorithms, protocol knowledge, or concrete implementation patterns used by this repository:
- BetterJoy / BetterJoyForCemu by David Khachaturov (Davidobot) is the original project and the foundation of this fork. Its Joy-Con protocol, controller lifecycle, CemuHook motion server, input mapping, and ViGEm output work remain at the core of this codebase.
- JoyconLib by Looking-Glass and JoyCon-Driver by mfosse provided the early Joy-Con HID/protocol implementations from which BetterJoy's controller code was derived.
- GamepadMotionHelpers by Julian "Jibb"
Smart is the principal reference for the current filtered gyro-mouse and gyro-stick motion
math.
GyroMousePlayerSpaceadapts its Y-up coordinate convention, gyro-propagated gravity tracking, shakiness-aware accelerometer correction, world-space yaw/pitch projection, and side-on singularity reduction. BetterJoy adds Joy-Con-specific axis normalization, grip recentering, diagnostics, and hardware-tested drift compensation around that foundation. - JoyShockMapper and the actively developed Electronicks fork were reference implementations for gyro-space selection and practical pointer behavior. BetterJoy's mapped 2D smoothing, low-speed tightening, real-world traversal/sensitivity control, and separation of gravity reference from gyro-produced cursor displacement were informed by this work.
- JoyShockLibrary, also by JibbSmart, informed
the canonical Nintendo-to-Y-up sensor frame and reference mouse behavior. Its v3.0 release is
additionally used by the standalone controller timing harness under
tools/JoyShockTiming. - Sebastian Madgwick's IMU/AHRS algorithm and the C# implementation published by
x-io Technologies are the
source of
MadgwickAHRS.cs, subsequently hardened and extended in BetterJoy with reset and recenter behavior. - FakerInput by Ryochan7 supplies the optional signed virtual HID input driver. BetterJoy's FakerInput backend implements its HID control protocol for relative/absolute mouse movement, wheel reports, and mouse-button state so gyro mouse can work across elevated windows, the Windows sign-in screen, and service/session boundaries. The bundled installer and license remain attributable to the upstream project.
- The UDP server is largely derived from rajkosto's ScpToolkit. ViGEmBus, ViGEmClient, HidHide, and their management libraries come from Nefarius.
The following projects were reviewed as independent comparisons for gyro mouse, gyro-to-stick, calibration, smoothing, sensitivity, remapping, and Windows virtual-controller behavior. Their source was not copied directly into BetterJoy, but their approaches materially informed design decisions and hardware tests:
- Yamakaky/gyromouse
- ascarrambad/gyromouse
- Handheld Companion
- DS4Windows
- GyroWiki for the documented player-space, world-space, sensitivity, calibration, and gyro-aiming principles implemented by the projects above
Third-party copyright and license notices for code and binaries distributed with BetterJoy are also retained in LICENSE and alongside bundled driver packages.
A massive thanks goes out to rajkosto for putting up with 17 emails and replying very quickly to my silly queries. The UDP server is also mostly taken from his ScpToolkit repo.
Also I am very grateful to mfosse for pointing me in the right direction and to Looking-Glass without whom I would not be able to figure anything out. (being honest here - the joycon code is his)
Many thanks to nefarius for his ViGEm and HidHide projects! Apologies and appreciation go out to epigramx, creator of WiimoteHook, for giving me the driver idea and for letting me keep using his installation batch script even though I took it without permission. Thanks go out to MTCKC for inspiration and batch files.
A last thanks goes out to dekuNukem for his documentation, especially on the SPI calibration data and the IMU sensor notes!
Massive thank you to all code contributors!
Icons (modified): "Switch Pro Controller", " Switch Detachable Controller Left", "Switch Detachable Controller Right" icons by Chad Remsing from the Noun Project. Super Nintendo Controller icon by Mark Davis from the the Noun Project; icon modified by Amy Alexander. Nintendo 64 Controller icon by Mark Davis from the the Noun Project; icon modified by Gino Moena.