A small VLESS panel built for Railway, with a Cloudflare-backed node generator.
It drives Xray directly, with no other panel underneath, and has no npm dependencies — everything comes from the Node standard library, so the build installs nothing and there is no dependency tree to audit.
nginx        the only process reachable from outside, on $PORT
railpanel    Node: the panel UI and its API, on 127.0.0.1
xray         the engine, running a config the panel writes
Two sides, deliberately separate:
| Core | Nodes | |
|---|---|---|
| Inbounds | up to 2, configured by hand | 1 generated set |
| Address | one per inbound | many, from clean IPs |
| Needs Cloudflare | no | yes |
| Clients | unlimited | unlimited |
- Fork this repository, or push its contents to a repository of your own.
- On railway.com, create a project → Deploy from GitHub repo → pick the repository.
- Railway reads the
Dockerfileand builds. The first build takes a few minutes because it downloads the Xray core.
Wait for the deployment to go green before the next step.
Settings → Volumes → Add Volume, mount path exactly:
/data
Without it, every redeploy erases your inbounds, clients and node set. This is the most common way to lose a working setup, so it comes before anything else.
Everything has a working default. Set these only if you want to.
| Variable | Default | Meaning |
|---|---|---|
PANEL_PATH |
(none) | serve the panel under a secret path |
PORT |
injected by Railway | public port — do not set this yourself |
PANEL_PORT |
8090 |
internal panel port |
XRAY_API_PORT |
10085 |
internal Xray stats API |
DATA_DIR |
/data |
volume mount path |
TZ |
Asia/Tehran |
container timezone |
RAILWAY_WORKSPACE_ID |
(none) | only if your account has several workspaces |
Set PANEL_PATH to something only you know:
PANEL_PATH = railpanel
The panel then answers only at https://your-domain.com/railpanel/. The root,
a wrong guess, even /api/... — all return the same blank page, so a scanner
cannot tell whether it is close.
Subscription links stay on the root (/sub/<id>): they are handed to other
people and should not carry the panel's whereabouts.
It lives in a variable rather than in the panel's own settings on purpose — a typo saved through the interface would lock you out with no way back, whereas a variable can always be changed from the Railway dashboard.
Settings → Networking → Generate Domain, and set the target port to:
8080
If Railway injects a different port, the first line of the deploy log says which one:
public=8080 panel=8090 data=/data
Whatever follows public= is the target port.
Railway accepts several domains on one service and all of them reach the same container, so a custom domain can be added alongside this one with the same target port.
Open the domain. The first sign-in asks for three things:
- Username —
railpanel - Password —
railpanel - Railway API token — from Railway → Account Settings → Tokens
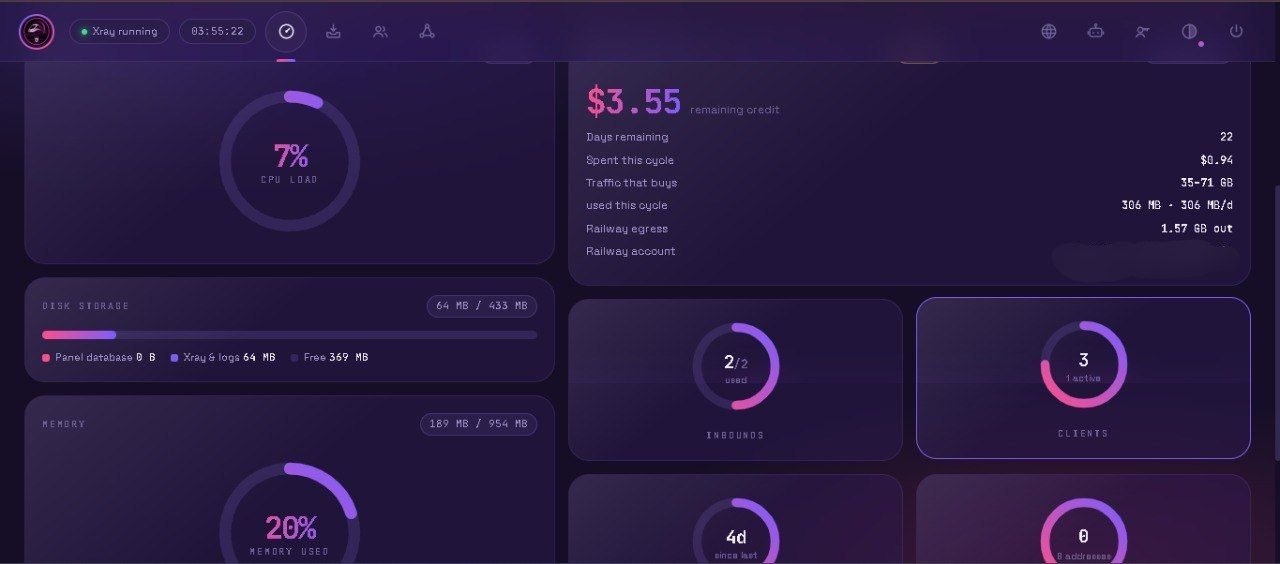
The token is checked with Railway before you are let in, and never asked for again. It powers the credit card on the dashboard: remaining balance, days left, and how much traffic that balance buys.
Change the username and password immediately. The panel prompts you.
The core side works on the Railway domain alone. The node generator needs a domain of your own behind Cloudflare, and this is why:
Cloudflare proxies HTTPS on six ports — 443, 2053, 2083, 2087, 2096, 8443 — and does so from thousands of edge addresses. Put your domain behind it and one server becomes dozens of distinct addresses, so a single blocked IP no longer takes everything down. Without Cloudflare there is one address on one port.
- Register a domain — a
.xyzor.topcosts two or three dollars a year. - Add it to Cloudflare on the free plan.
- Change the nameservers at your registrar to the two Cloudflare gives you.
- Wait for Cloudflare to report the domain as active.
- Railway → Settings → Networking → Custom Domain. Enter the hostname you
want, for example
game.example.com, with target port8080. Railway shows a CNAME target. - Cloudflare → DNS → Add record:
- Type:
CNAME - Name: the subdomain, e.g.
game - Target: what Railway gave you
- Proxy status: grey cloud, DNS only — for now
- Type:
- Wait for the green tick next to the domain in Railway. The certificate is issued in this window, and Cloudflare's proxy would intercept the challenge and make it fail.
- Now switch the cloud to orange.
- Cloudflare → SSL/TLS → Overview → Full. Not Full (Strict), which Railway's own documentation advises against, and not Flexible, which makes the panel see plain HTTP and hand out broken links.
If the certificate ever gets stuck validating, set the cloud back to grey, wait for the tick, and switch it to orange again.
Nodes → enter the domain → Verify.
The panel issues itself a one-time token and calls its own public address to see whether it comes back. Anything less would accept a domain that points somewhere else entirely.
If it reports that the proxy is off, the cloud is still grey — only port 443 would work.
Nodes → Node settings.
- Addresses — leave empty and the panel resolves your domain's own A and AAAA records, which already gives several real Cloudflare edges. Better: scan from your own network and paste the results, one per line. Lists passed around in channels are the ones everyone else uses, so they get blocked first.
- Ports — 443 is on by default. The other five work through Cloudflare but many networks pass only 443; turn them on only after testing that they reach you.
- Tuning — keep ALPN on
http/1.1. If h2 gets negotiated the WebSocket upgrade fails and every node stops working.
Press Generate. One renameable Remark is created holding every node. To build a different set, delete it first — the clients survive and reattach.
Nodes → Clients → + with whatever traffic limit and expiry you want, then copy the subscription link from that client's row.
One link works everywhere: the panel reads the client's own name and serves the format it expects.
| App | Format served |
|---|---|
| v2rayNG, v2rayN, Streisand, NekoBox, Karing, V2Box, FoXray | base64 list |
| Clash Meta, Mihomo | YAML profile |
| sing-box, Hiddify | JSON profile |
Opening the same link in a browser shows a page with the remaining traffic and time, a QR code, and one-tap import buttons.
Nodes → Test from the server dials every port from inside the container and reports which answer, whether nginx routes to Xray, whether Xray is running, and whether Cloudflare is proxying.
This separates a server problem from a network problem in one click, which is worth far more than guessing from a client that will not connect.
Robot icon → Telegram alerts.
Get a bot token from @BotFather and your numeric chat id from @userinfobot. Send your bot a message first — Telegram refuses to deliver to anyone who has not written to it.
The token is verified by sending a test message before it is saved. Reports carry the current backup, so the newest restorable copy is always waiting in the chat. The bot only sends; it accepts no commands.
Backup dial on the dashboard. Download gives you a JSON file holding inbounds, clients, the node set and its settings. Restore reads the file, tells you what it contains, and asks before replacing anything.
The panel password and the Railway token are deliberately left out: a backup often travels through a chat app, and a stolen file should not also be a stolen login.
The container idles at roughly 100 MB of memory, which is a dollar or two a month. Egress is what actually runs out: video is measured in gigabytes per hour, so a habit of streaming will empty a five dollar balance far faster than the panel itself ever could. Set traffic limits on clients, and set a usage limit in Railway.
پنل سبک VLESS برای Railway، همراه با تولیدکنندهی نود پشت کلادفلر.
مستقیم Xray را اجرا میکند، بدون هیچ پنل دیگری زیرش، و هیچ وابستگی npm ندارد — همهچیز از کتابخانهی استاندارد Node میآید، پس بیلد چیزی نصب نمیکند و درخت وابستگیای برای بررسی وجود ندارد.
nginx تنها پروسهی قابل دسترس از بیرون، روی $PORT
railpanel Node: رابط پنل و API آن، روی 127.0.0.1
xray موتور، با کانفیگی که پنل مینویسد
دو بخش، عمداً جدا از هم:
| هسته | نودها | |
|---|---|---|
| اینباند | حداکثر ۲، دستی | یک مجموعهی تولیدشده |
| آدرس | یکی برای هر اینباند | چندین، از IPهای تمیز |
| نیاز به کلادفلر | ندارد | دارد |
| کلاینت | نامحدود | نامحدود |
۱. این ریپازیتوری را fork کن، یا محتوایش را در ریپوی خودت push کن.
۲. در railway.com پروژه بساز → Deploy from GitHub repo → ریپو را انتخاب کن.
۳. Railway فایل Dockerfile را میخواند و بیلد میکند. بیلد اول چند دقیقه طول میکشد چون هستهی Xray را دانلود میکند.
صبر کن تا دیپلوی سبز شود، بعد سراغ قدم بعد برو.
Settings → Volumes → Add Volume با مسیر دقیقاً:
/data
بدون آن، هر دیپلوی مجدد تمام اینباندها و کلاینتها و مجموعهی نودت را پاک میکند. رایجترین راه از دست دادن یک راهاندازی سالم همین است، برای همین قبل از هر چیز دیگری میآید.
همهچیز پیشفرض کارآمد دارد. اینها را فقط اگر خواستی تنظیم کن.
| متغیر | پیشفرض | معنی |
|---|---|---|
PANEL_PATH |
ندارد | نمایش پنل زیر یک مسیر مخفی |
PORT |
توسط Railway تزریق میشود | پورت عمومی — خودت تنظیمش نکن |
PANEL_PORT |
8090 |
پورت داخلی پنل |
XRAY_API_PORT |
10085 |
API آمار داخلی Xray |
DATA_DIR |
/data |
مسیر Volume |
TZ |
Asia/Tehran |
منطقهی زمانی کانتینر |
RAILWAY_WORKSPACE_ID |
ندارد | فقط اگر حسابت چند ورکاسپیس دارد |
PANEL_PATH را روی چیزی بگذار که فقط خودت میدانی:
PANEL_PATH = railpanel
آنوقت پنل فقط از https://your-domain.com/railpanel/ باز میشود. ریشه، هر
حدس اشتباه، حتی /api/... — همه یک صفحهی سفید یکسان میدهند، پس اسکنر
نمیتواند بفهمد نزدیک شده یا نه.
لینکهای ساب روی ریشه میمانند (/sub/<id>): آنها به دیگران داده میشوند و
نباید محل پنل را لو بدهند.
عمداً در متغیر است نه در تنظیمات خود پنل — یک اشتباه تایپی که از داخل رابط ذخیره شود تو را بیرون قفل میکند بدون راه برگشت، در حالی که متغیر همیشه از داشبورد Railway قابل تغییر است.
Settings → Networking → Generate Domain و پورت مقصد را بگذار:
8080
اگر Railway پورت دیگری تزریق کرد، خط اول لاگ دیپلوی میگوید کدام است:
public=8080 panel=8090 data=/data
هر عددی که جلوی public= بود، همان پورت مقصد است.
Railway چند دامنه روی یک سرویس میپذیرد و همه به یک کانتینر میرسند، پس میتوانی دامنهی اختصاصی را هم با همان پورت مقصد کنارش اضافه کنی.
دامنه را باز کن. اولین ورود سه چیز میخواهد:
- نام کاربری —
railpanel - رمز عبور —
railpanel - توکن API ریلوی — از Railway → Account Settings → Tokens
توکن قبل از ورود با Railway بررسی میشود و دیگر هرگز پرسیده نمیشود. کارت اعتبار در داشبورد را همین توکن پر میکند: موجودی باقیمانده، روزهای مانده، و اینکه آن موجودی چقدر ترافیک میخرد.
نام کاربری و رمز را بلافاصله عوض کن. پنل خودش یادآوری میکند.
بخش هسته با همان دامنهی Railway کار میکند. تولیدکنندهی نود به دامنهی خودت پشت کلادفلر نیاز دارد، و دلیلش این است:
کلادفلر HTTPS را روی شش پورت پروکسی میکند — ۴۴۳، ۲۰۵۳، ۲۰۸۳، ۲۰۸۷، ۲۰۹۶، ۸۴۴۳ — و از هزاران آدرس لبه. دامنهات را پشتش بگذار و یک سرور به دهها آدرس متمایز تبدیل میشود، پس یک IP بلاکشده دیگر همهچیز را نمیخواباند. بدون کلادفلر، یک آدرس روی یک پورت داری و بس.
۱. یک دامنه بخر — .xyz یا .top سالی دو سه دلار است.
۲. در کلادفلر با پلن رایگان اضافهاش کن.
۳. نیمسرورها را در پنل ثبتکنندهات به دو نیمسروری که کلادفلر میدهد تغییر بده.
۴. صبر کن تا کلادفلر دامنه را Active اعلام کند.
۱. Railway → Settings → Networking → Custom Domain. نامی که میخواهی را وارد کن، مثلاً game.example.com، با پورت مقصد 8080. Railway یک مقصد CNAME میدهد.
۲. کلادفلر → DNS → Add record:
- Type:
CNAME - Name: زیردامنه، مثلاً
game - Target: همان که Railway داد
- Proxy status: ابر خاکستری، DNS only — فعلاً
۳. صبر کن تا تیک سبز کنار دامنه در Railway بیاید. گواهی در همین بازه صادر میشود و پروکسی کلادفلر چالش صدور را میگیرد و شکستش میدهد.
۴. حالا ابر را نارنجی کن.
۵. کلادفلر → SSL/TLS → Overview → Full. نه Full (Strict) که مستندات خود Railway از آن پرهیز میدهد، و نه Flexible که باعث میشود پنل اتصال را HTTP ساده ببیند و لینک خراب بسازد.
اگر گواهی روی حالت Validating گیر کرد، ابر را خاکستری کن، صبر کن تا تیک بیاید، دوباره نارنجی کن.
نودها → دامنه را وارد کن → بررسی.
پنل یک توکن یکبارمصرف میسازد و آدرس عمومی خودش را صدا میزند تا ببیند همان برمیگردد. هر چیز کمتری، دامنهای را میپذیرفت که به جای دیگری اشاره میکند.
اگر گفت پروکسی خاموش است، یعنی ابر هنوز خاکستری است — آنوقت فقط پورت ۴۴۳ کار میکند.
نودها → تنظیمات نود.
-
آدرسها — خالی بگذار و پنل رکوردهای A و AAAA خود دامنهات را resolve میکند که همان هم چند لبهی واقعی کلادفلر میدهد. بهتر: از شبکهی خودت اسکن کن و نتیجه را هر خط یکی بچسبان. لیستهایی که در کانالها دستبهدست میشود همانی است که بقیه هم دارند، پس زودتر از همه بلاک میشود.
-
پورتها — ۴۴۳ پیشفرض روشن است. پنج پورت دیگر از طریق کلادفلر کار میکنند ولی خیلی از شبکهها فقط ۴۴۳ را رد میکنند؛ بقیه را فقط بعد از تست کردن روشن کن.
-
تنظیم دقیق — ALPN را روی
http/1.1نگه دار. اگر h2 مذاکره شود، ارتقا به WebSocket شکست میخورد و همهی نودها از کار میافتند.
تولید را بزن. یک ریمارک قابل تغییر نام ساخته میشود که همهی نودها را نگه میدارد. برای ساخت مجموعهی متفاوت اول حذفش کن — کلاینتها میمانند و به مجموعهی بعدی وصل میشوند.
نودها → کلاینتها → + با هر سقف ترافیک و انقضایی که میخواهی، بعد لینک ساب را از ردیف همان کلاینت کپی کن.
یک لینک همهجا کار میکند: پنل نام خود برنامه را میخواند و فرمتی که انتظار دارد را میدهد.
| برنامه | فرمت دریافتی |
|---|---|
| v2rayNG، v2rayN، Streisand، NekoBox، Karing، V2Box، FoXray | لیست base64 |
| Clash Meta، Mihomo | پروفایل YAML |
| sing-box، Hiddify | پروفایل JSON |
باز کردن همان لینک در مرورگر، صفحهای با حجم و زمان باقیمانده، کد QR، و دکمههای ایمپورت مستقیم نشان میدهد.
نودها → تست از روی سرور هر پورت را از داخل کانتینر امتحان میکند و گزارش میدهد کدام جواب میدهد، آیا nginx به Xray مسیر میدهد، آیا Xray در حال اجراست، و آیا کلادفلر پروکسی میکند.
این با یک کلیک مشکل سرور را از مشکل شبکه جدا میکند، که خیلی بیشتر از حدس زدن از روی کلاینتی که وصل نمیشود میارزد.
آیکن ربات → اعلانهای تلگرام.
توکن بات را از @BotFather و شناسهی عددی چت را از @userinfobot بگیر. اول خودت به بات پیام بده — تلگرام اجازه نمیدهد باتی به کسی پیام بدهد که با آن حرف نزده.
توکن قبل از ذخیره با فرستادن یک پیام آزمایشی بررسی میشود. گزارشها بکاپ فعلی را همراه دارند، پس تازهترین نسخهی قابل بازیابی همیشه در چت هست. بات فقط میفرستد و هیچ فرمانی نمیپذیرد.
دایرهی بکاپ در داشبورد. دانلود یک فایل JSON میدهد شامل اینباندها، کلاینتها، مجموعهی نود و تنظیماتش. بازیابی فایل را میخواند، میگوید چه چیزی داخلش است، و قبل از جایگزینی میپرسد.
رمز پنل و توکن Railway عمداً داخلش نیستند: بکاپ معمولاً از یک پیامرسان رد میشود، و فایل دزدیدهشده نباید همزمان یعنی حساب دزدیدهشده.
کانتینر در حالت بیکار حدود ۱۰۰ مگابایت رم میگیرد که ماهی یک دو دلار است. آنچه واقعاً تمام میشود ترافیک خروجی است: ویدیو با گیگابایت در ساعت اندازه گرفته میشود، پس عادت به استریم، موجودی پنج دلاری را خیلی سریعتر از خود پنل خالی میکند. روی کلاینتها سقف ترافیک بگذار، و در Railway یک Usage Limit تعیین کن.
Generated with ❤ by ForceRun